# TL;DR
在 VS Code 里面,一个插件可以调用其他插件暴露的 Api 接口。于是,Github Copilot 的功能可以毕竟容易的做成一个 Http 服务。
# 背景
我仍然记得第一次使用 Github Copolit,他给我带来的惊喜。
2021 年的一个夏天,我随手在 VSCode 中写下一句函数的名称。仅稍等片刻,它竟然直接帮我写出来函数的实现,和我设想中的代码几乎一致,甚至还贴心的加上了注释。
这和我之前见到的所谓的“人工智能”、“设计稿转码”等完全不是一个段位。于是我赶紧去搜索这个神奇的副驾驶背后是什么技术,于是知道了 Open AI,知道了 GPT 模型。
2022 年,Open AI 发布了 GPT 3.5 模型,我迫不及待的去注册了 Open AI 的账号,获取到了 Api 接口免费额度。紧接着,我给 Yank Note 制作了一个简易的 Open AI 扩展。
但是,Open AI 的免费额度也不多,有效期页很快就过了。我想付费,但无奈国内的信用卡无法被添加到付费方式中。
我还是非常想把 Github Copilot 流畅的补全文本的功能加入到 Yank Note 中使用,想过一些方案:
- 购买 Open AI 接口:付费难度大,价格太贵。
- 使用 Chat GPT:可以尝试模拟请求或者装 Chrome 插件的方式。不过可以预想这些方式都不会很稳定
- 使用 Github Copilot:尝试模拟请求/或者其他某种方式暴露出接口
对于使用 Github Copilot 的这种方式,我其实蓄谋已久了。之前粗略的看了一下他的 VSCode 拓展,感觉蛮复杂,于是作罢。因为我需要相对比较稳定的方式,如果方案比较麻烦,又容易失效,那还是别搞了。
不过,我无意间看到 VSCode 的插件系统,可以调用其他插件的 Api,忽然觉得这条路或许可行,甚至还非常容易。
# VSCode 插件能力
参考VSCode 插件 API 手册 (opens new window),可以通过这种方式把插件的一些功能暴露出去给其他插件使用:
Extension writers can provide APIs to other extensions by returning their API public surface from the activate-call.
export function activate(context: vscode.ExtensionContext) {
  let api = {
    sum(a, b) {
      return a + b;
    },
    mul(a, b) {
      return a * b;
    }
  };
  // 'export' public api-surface
  return api;
}
1
2
3
4
5
6
7
8
9
10
11
12When depending on the API of another extension add an extensionDependencies-entry to package.json, and use the getExtension-function and the exports-property, like below:
let mathExt = extensions.getExtension('genius.math');
let importedApi = mathExt.exports;

console.log(importedApi.mul(42, 1));
1
2
3
4
# 分析 GitHub Copilot 插件
我写了一个 VSCode 插件,使用 extensions.getExtension('github.copilot') 看看 Github Copilot 插件是否暴露了什么有用的 Api。
不过很可惜,这个插件只暴露了一个名为 ctx 的变量(但是比较重要),并不能直接使用。
于是我找到 Github Copilot 插件的目录,把这个大约 2M 压缩后的 extension.js 文件展开,阅读代码,发现其实对于行内补全这个功能的整体流程,这个插件做的事情没有之前想象的复杂,也没有过深的函数调用。比起我之前分析的很多混淆压缩的 js 文件,算是非常纯粹且小菜一碟了。
# 插件激活
我比较关心的是插件的挂载激活部分做了什么事,关键代码如下:
找到 active 挂载入口
kE(ZMe, {
    Extension: ()=>g0,
    activate: ()=>XMe,
    createExtensionContext: ()=>vae,
    onDeactivate: ()=>xae
});
1
2
3
4
5
6查看激活流程
async function XMe(e) {
    // 省略一些代码
    let n = l(async()=>{
        // 省略一些代码
        r.get(Ms).getCopilotToken(r).then(()=>{
            // 省略一些代码
        }
    }
    return Zs.authentication.onDidChangeSessions(async i=>{
        await hoe(i, r)
    }
    ),
    new wE().startup(r),
    await n(),
    new TE(r)
}
1
2
3
4
5
6
7
8
9
10
11
12
13
14
15
16暴露 的 Api
var TE = class {
    constructor(t) {
        this.ctx = t
    }
    static{l(this, "CopilotExtensionApi")
    }captureExtensionTelemetry(t) {
        return nZ(this.ctx, t)
    }
    setupNextCompletion(t) {
        this.clearCompletionsCache(),
        this.ctx.forceSet(jl, new EE(t)),
        this.ctx.forceSet(Ul, new CE("parsing"))
    }
    clearCompletionsCache() {
        this.ctx.get(oc).clear(),
        jre()
    }
}
1
2
3
4
5
6
7
8
9
10
11
12
13
14
15
16
17
18
可以看出,Github Copolit 插件等到登录完成后,会暴露一个 TE 实例出去,里面就有我们之前看到的 ctx 变量。
# 文本补全
VSCode 的文本内联补全是由插件调用 registerInlineCompletionItemProvider 注册一个补全处理器来实现的。因此直接源码搜索这个就好了
function coe(e) {
    let t = new zk(e)
      , r = W0.languages.registerInlineCompletionItemProvider({
        pattern: "**"
    }, t)
      , n = W0.commands.registerCommand(soe, async i=>ZLe(e, i));
    e.get(g0).register(r, n)
}
2
3
4
5
6
7
8
可以看到 zk 这个类就是用来干这个活儿的。顺藤摸瓜,找到真正干活儿的方法
async function Bre(e, t, r, n, i, o) {
    // 一系列复杂的过程,如获取文档信息,防抖,其他等等等等
}
2
3
# 更改 GitHub Copilot 插件
通过上面的分析,我们知道了我们要做的事情便是把 Bre 方法暴露给 Api 接口。不过可能为了减少各个插件系统的适配成本,这个方法的第二个参数 t 是 Github Copilot 自己包装的一层文档适配器。所以为了简便,我们还是直接用调用他的父级比较好,也就是下面的 VLe 方法
async function VLe(e, t, r, n, i) {
    let o = new Gk(t)
    // 省略代码
    let u = await Bre(e, o, r, ...)
    // 省略代码
}
2
3
4
5
6
把上面的步骤写成脚本,来更改 extension.js
const fs = require('fs');
const path = process.argv[2];

const js = fs.readFileSync(path, 'utf8');
const apiReg = /class\{constructor\([^)]+\)\{[^}]+\}[^}]+CopilotExtensionApi/;

if (!fs.existsSync(path + '.bak')) {
  fs.copyFileSync(path, path + '.bak');
}

if (!apiReg.test(js)) {
  throw new Error('Could not find extension api constructor [apiReg]');
}

const replaced = js.replace(apiReg, (match) => {
  if (!match.includes('this.ctx=')) {
    throw new Error('Could not find extension api constructor [this.ctx=]');
  }

  const matches = js.match(/\(([a-zA-Z]+),"calculateInlineCompletions"\)/);
  if (!matches) {
    throw new Error('Could not find extension api constructor [calculateInlineCompletions]');
  }

  const name = matches[1];

  return match.replace('this.ctx=', `this.calculateInlineCompletions=${name};this.ctx=`);
});


fs.writeFileSync(path, replaced, 'utf8');

console.log(`replace ${path}`, js.length, replaced.length);
2
3
4
5
6
7
8
9
10
11
12
13
14
15
16
17
18
19
20
21
22
23
24
25
26
27
28
29
30
31
32
33
用 node 运行上面的脚本,传入 extension.js 文件路径即可。
# 编写辅助插件
这里的思路就是用 express 启一个服务器,然后调用暴露出来的接口即可。代码我放在了 Github (opens new window)。
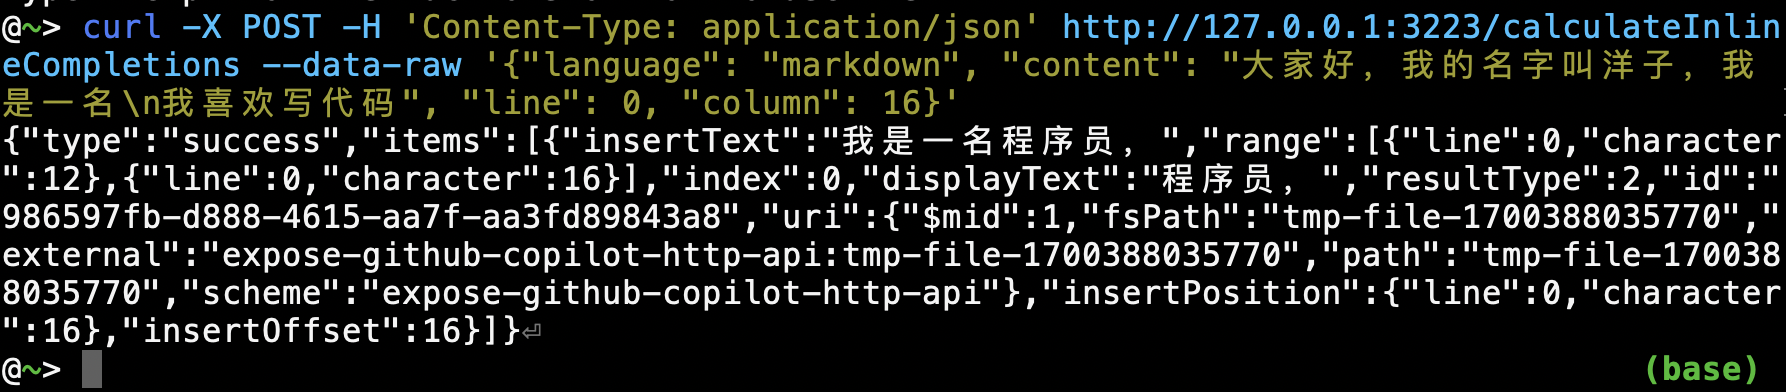
效果如下:
# 对接 Yank Note
把下面的内容,写成一个js文件,放置到 Yank Note js 插件目录,然后重启 Yank Note 即可。代码我也放在了上面的 Github (opens new window) 仓库中, 请参考仓库中的文件:yn-github-copilot.js。
# 使用效果
只要我电脑上运行着 VSCode ,那么我就可以使用这个自动补全接口了,在 Yank Note 中也能实现自动补全。
本文由「Yank Note - 一款强大可扩展的 Markdown 编辑器,为生产力而生 (opens new window)」撰写